I have been wanting to configure a VPN Connection from AWS to my house, but my cheap Netgear router does not support IPSec. So, I picked up an old Cisco 871 router that does. I didn’t want to sacrifice the speed (it supports 802.11ac while the 871 is an old 802.11g device) and features of my Netgear router, so I put the 871 behind the Netgear and modified the VPN configuration for NAT traversal.
The 871 (or a similar device) is a great way to get some hands on experience configuring a Virtual Private Gateway. Despite its age, the 871 is actually a capable device and it’s available on eBay for less than $100. While most production implementations will not require NAT traversal, this is also good experience. You may want to peer two VPCs (in the same or different regions) and one common solution is to use two Cisco CSR1000V (available in the AWS Marketplace). In this configuration both CSR100V devices will require an Elastic IP, which uses NAT.

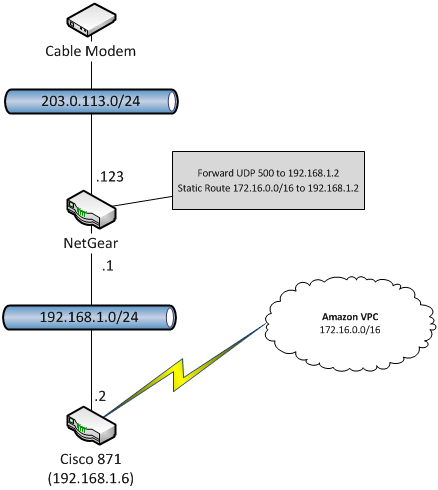
My configuration looks like the diagram below. I am using a Netgear router, but any router will work. My cable provider has assigned the address 203.0.113.123 to my Netgear router which also has a private address of 192.168.1.1. I have assigned the Cisco 871 a static IP address of 192.128.1.2 (make sure to exclude this from the DHCP pool on the router). My AWS VPC has the CIDR block 172.16.0.0/16. I have configured a static route on the Netgear that forwards all traffic destined for 172.16.0.0/16 to 192.168.1.2. In addition, I added a port forwarding rule to the Netgear that forwards UDP port 500 to 192.168.1.2.
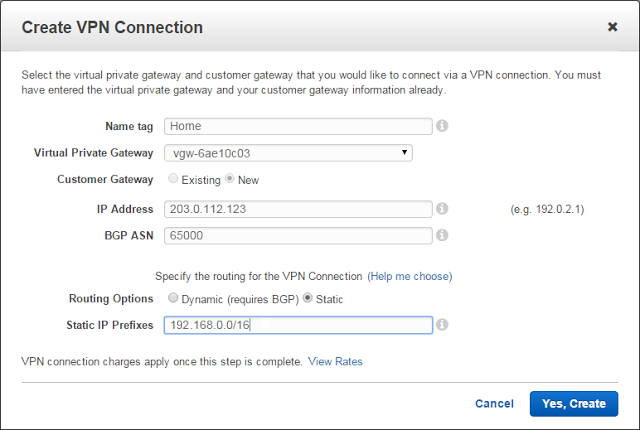
In the AWS VPC console, I created a VPN Connection as shown below. Note that I have entered the public IP address of the Netgear router (203.0.113.123) as the IP address of a new Customer Gateway. I also configured static routing and entered the CIDR block of my home network (192.168.0.0/16).
Once the VPN connection is created you can download the router configuration. I choose a Cisco Systems ISR Series Router. In order to support NAT traversal you will need to modify the configuration slightly. You need to find the six places where the public IP address appears and replace it with the private IP address of the IPSec router. Not that there will two of each of the highlighted sections below, one for Tunnel1 and one for Tunnel2.
1
2
3
4
|
crypto keyring keyring-vpn-d67b98bf-0
  local-address 203.0.113.123 !Replace with 192.168.1.2
pre-shared-key address 54.240.217.162 key XXXXXXXXXXXXXXXXX
exit
|
 1
 2
 3
 4
 5
 6
 7
 8
 9
10
11
12
13
14
15
16
17
18
19
|
crypto isakmp profile isakmp-vpn-d67b98bf-0
  local-address 203.0.113.123 !Replace with 192.168.1.2
  match identity address 54.240.217.162
  keyring keyring-vpn-d67b89bf-0
exit

crypto ipsec fragmentation before-encryption
interface Tunnel1
  ip address 169.254.255.2 255.255.255.252
  ip virtual-reassembly !Protects against Fragment attacks
  tunnel source 203.0.113.123 !Replace with 192.168.1.2
  tunnel destination 54.240.217.162
  tunnel mode ipsec ipv4
  tunnel protection ipsec profile ipsec-vpn-d67b98bf-0
  ! This option causes the router to reduce the Maximum Segment Size of
  ! TCP packets to prevent packet fragmentation.
  ip tcp adjust-mss 1387
  no shutdown
exit
|
In addition, I needed to change the ip sla timeout because the 871 is too old to support the default value, but this is unique to the 871.
1
2
3
4
5
|
ip sla 100
   icmp-echo 169.254.255.1 source-interface Tunnel1
   timeout 1000 !AWS uses 1000.  Min on 871 is 5000.
   frequency 5
exit
|
With static routing AWS is not advertising routes over the VPN tunnel. Therefore, I had to add the route statements to the 871 manually. The first statement uses the default administrative distance of 1 and therefore tell the router to prefer Tunnel1. If SLA 100 fails, this route will be removed and Tunnel2 with administrative distance of 10 will take over.
1
2
|
ip route 172.16.0.0 255.255.0.0 Tunnel1 track 100
ip route 172.16.0.0 255.255.0.0 Tunnel2 10 track 200
|
Extra Credit: Securing the Home Network
In order to protect my home network from nefarious traffic from AWS, I added a “firewall” policy using inspect statements on the 871. The ACL defines what is allowed from AWS. In this case, just ping for testing. All traffic to AWS is allowed and the inspect rules open the return path for any traffic initiated from my house. SSH and FTP defines high level inspect rules specific to these protocols.
 1
 2
 3
 4
 5
 6
 7
 8
 9
10
11
12
13
14
15
16
17
18
19
20
21
|
ip inspect name TrafficToAWS tcp
ip inspect name TrafficToAWS udp
ip inspect name TrafficToAWS icmp
ip inspect name TrafficToAWS ssh
ip inspect name TrafficToAWS ftp

ip access-list extended TrafficFromAWS
 permit icmp any any echo
 permit icmp any any echo-reply
 !NOTE: echo-reply needed for sla ping
exit

interface Tunnel1
 ip access-group TrafficFromAWS in
 ip inspect TrafficToAWS out
exit

interface Tunnel2
 ip access-group TrafficFromAWS in
 ip inspect TrafficToAWS out
exit
|
This is when it gets interesting. While my configuration gives priority to Tunnel1 when sending traffic to AWS, AWS uses both tunnels for return traffic. The issue is that the inspect rules only allow return traffic on the tunnel it exited. Therefore, if a request goes out Tunnel1 but the response is received on Tunnel2, the router will block it. I simply disabled Tunnel2, sacrificing redundancy, but plan to dig into this a bit deeper when I get a chance. If you beat me to it, let me know how you fixed it.


