AWS VPN on a UniFi Cloud Gateway Max
Brian
I recently replaced my UniFi Security Gateway with a UniFi Cloud Gateway Max. In 2020 I wrote about connecting the USG to AWS with two redundant IPsec tunnels and BGP that was very popular (by my standards anyway). That configuration worked, but it required a hand-built config.gateway.json file because the USG controller could not configure redundant route-based tunnels or BGP.
Six years later, I have upgraded to the UCG-Max and the configuration is much easier. The current UniFi Network application can create route-based IPsec tunnels in the UI, and current UniFi gateways can run BGP from an uploaded FRR configuration. There is still some assembly required, but I no longer need to build the entire VPN configuration by hand.
This post starts from scratch. You do not need to have followed the old post, and I am not going to walk through converting its JSON configuration. I am going to create two redundant IKEv2 tunnels between a UniFi Cloud Gateway Max and an AWS Transit Gateway, then use BGP to exchange routes and install both tunnels as equal-cost paths.
Overview
In this post I am going to walk through configuring the following scenario.

Creating the AWS VPN Connection
I am starting with an existing Transit Gateway and VPC attachment. First, open the AWS VPC console and check the Transit Gateway options. VPN ECMP support must be enabled. ECMP allows AWS to use both tunnels instead of keeping one only as a standby path.
Next, create a Customer Gateway:
| Field | Value |
|---|---|
| Name | home-ucg |
| BGP ASN | 65000 |
| IP address | your UCG public IP, 203.0.113.106 in this example |
| Certificate ARN | none |
| Device | optional |
AWS associates the public address with the Customer Gateway object. If your public address changes, you will need to create a new Customer Gateway and update the VPN connection. Selecting the WAN interface in UniFi, rather than typing the address into each tunnel, keeps the UCG side independent of that change.
Now create a Site-to-Site VPN connection:
| Field | Value |
|---|---|
| Name | home-aws-vpn |
| Target gateway type | Transit Gateway |
| Transit Gateway | your existing Transit Gateway |
| Customer Gateway | home-ucg |
| Routing options | Dynamic |
| Tunnel inside IP version | IPv4 |
| Local IPv4 network CIDR | 0.0.0.0/0 |
| Remote IPv4 network CIDR | 0.0.0.0/0 |
Dynamic routing is important. BGP will exchange the real routes after the tunnels are established. Do not add static routes to the tunnel configuration.
Tunnel Options
Expand the options for both tunnels. I configured the tunnels identically except for the inside CIDR and pre-shared key.
| Option | Tunnel 1 | Tunnel 2 |
|---|---|---|
| Inside IPv4 CIDR | 169.254.162.140/30 |
169.254.86.176/30 |
| Pre-shared key | unique key 1 | unique key 2 |
| Phase 1 encryption | AES256 only | AES256 only |
| Phase 2 encryption | AES256 only | AES256 only |
| Phase 1 integrity | SHA2-256 only | SHA2-256 only |
| Phase 2 integrity | SHA2-256 only | SHA2-256 only |
| Phase 1 DH group | 14 only | 14 only |
| Phase 2 DH group | 14 only | 14 only |
| IKE version | IKEv2 only | IKEv2 only |
| Phase 1 lifetime | 28800 | 28800 |
| Phase 2 lifetime | 3600 | 3600 |
| DPD timeout | 30 | 30 |
| DPD action | Restart | Restart |
| Startup action | Start | Start |
AWS initially selects several algorithms. I removed the extra values rather than leaving AWS and UniFi to negotiate among them. One value in each list makes the result predictable and makes a mismatch easier to find.
Startup action = Start tells AWS to initiate the tunnels and keep trying if they go down. This requires IKEv2. It also avoids one of the limitations in my old USG configuration, where the available StrongSwan options could not simply keep the tunnel started.
AWS pre-shared keys may contain letters, numbers, periods, and underscores. They must be 8 to 64 characters and cannot begin with zero. I generated a different 40-character key for each tunnel:
|
|
Create the connection and wait until its state is Available. The two tunnels will be down because the UCG is not configured yet.
Downloading the AWS Configuration
Select the VPN connection and download its configuration. The file is useful for collecting the outside addresses, inside addresses, pre-shared keys, and BGP ASNs.
AWS also puts sample crypto and MTU values in the file. Those values may describe the minimum generic profile rather than the tunnel options you selected. My Generic file showed AES128, SHA1, and DH group 2 even though the connection was configured for AES256, SHA2-256, and DH group 14. Use the tunnel options shown in the AWS console, not the generic sample profile.
For each tunnel, record these values:
- AWS outside IP
- Customer Gateway inside IP
- AWS inside IP, which will become the BGP neighbor
- Pre-shared key
- Customer Gateway and AWS ASNs
AWS assigns the first usable address in each /30 to its side and the second to the Customer Gateway in this example. The downloaded configuration is the final authority. If it gives you different addresses, use them.
Configuring the First UniFi Tunnel
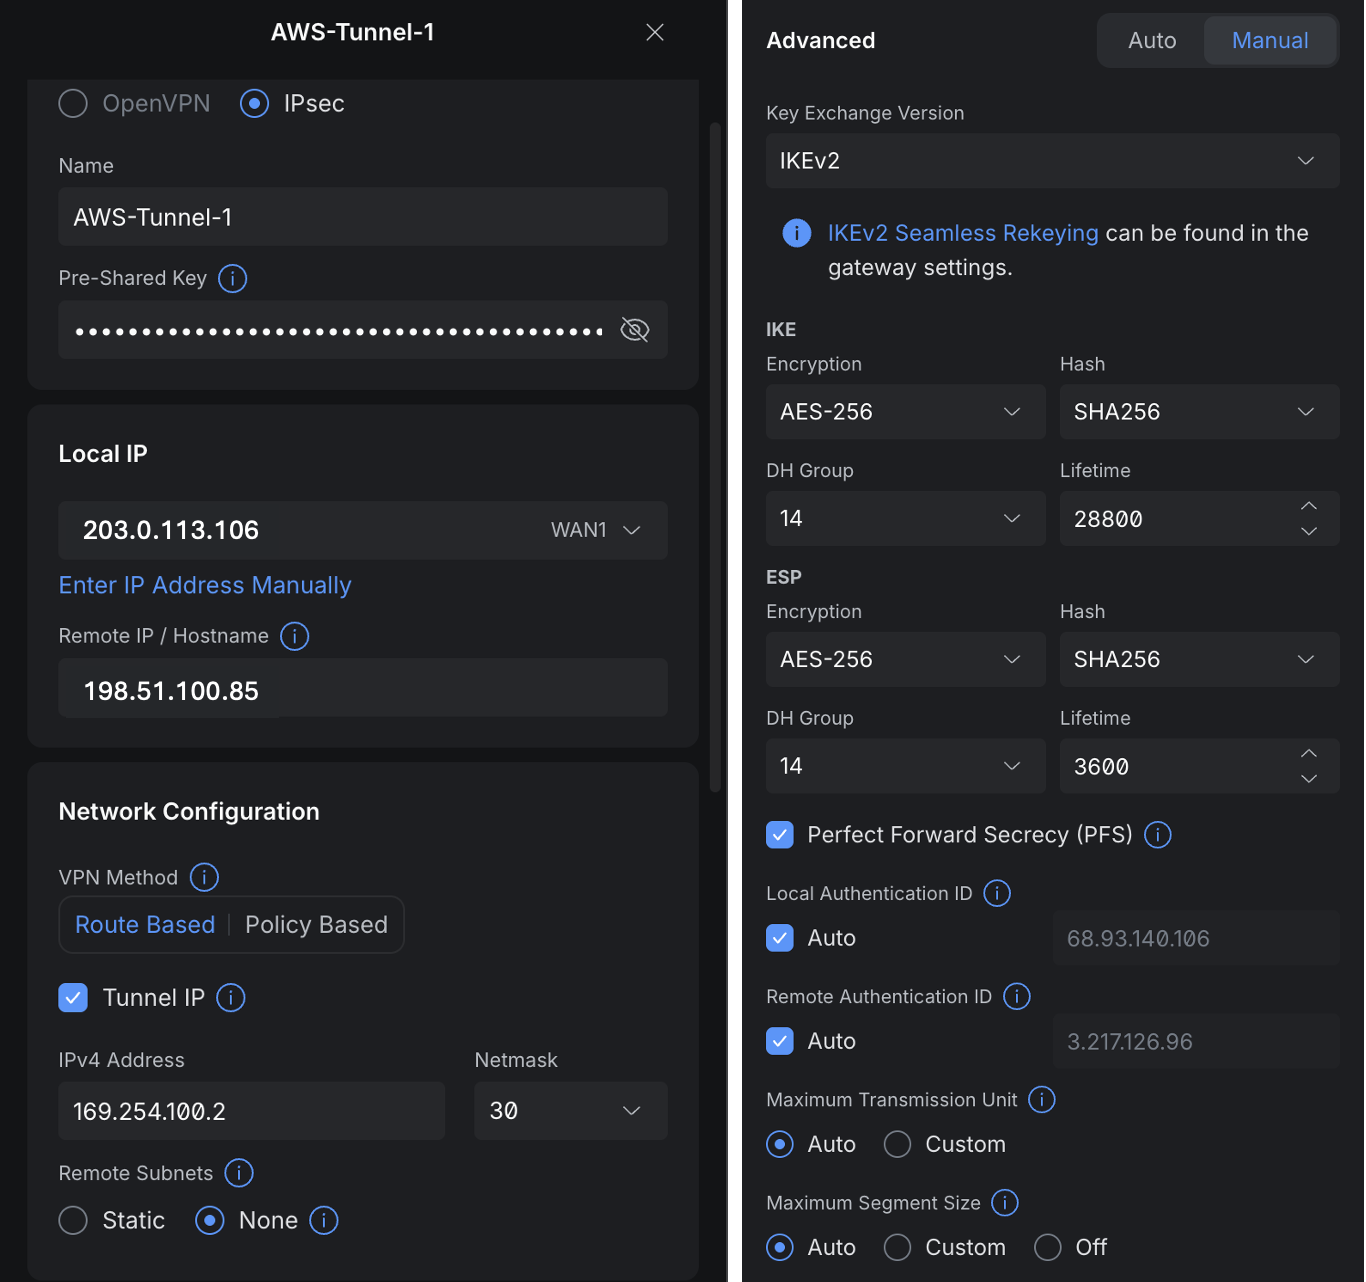
In UniFi Network, open Settings, VPN, Site-to-Site VPN, then create a Manual IPsec connection.
Configure the first tunnel:
| Field | Value |
|---|---|
| Name | AWS-Tunnel-1 |
| Pre-shared key | Tunnel 1 key from AWS |
| Local IP / Server Address | WAN interface |
| Remote IP | 198.51.100.85 |
| Route-Based VPN | Enabled |
| Tunnel IP | 169.254.162.142/30 |
| Remote Networks | None |
| Advanced | Manual |
Then configure the advanced options:
| Field | Value |
|---|---|
| Key Exchange Version | IKEv2 |
| IKE Encryption | AES-256 |
| IKE Hash | SHA256 |
| IKE DH Group | 14 |
| IKE Lifetime | 28800 |
| ESP Encryption | AES-256 |
| ESP Hash | SHA256 |
| ESP DH Group | 14 |
| ESP Lifetime | 3600 |
| Perfect Forward Secrecy | Enabled |
| Local Authentication ID | Auto |
| Remote Authentication ID | Auto |
| MTU | Auto |
There are two settings here that are easy to miss.
First, select the WAN interface for the local address rather than typing the public IP. Second, leave Remote Networks empty. This is a route-based tunnel and BGP will install the AWS routes. Adding remote networks here creates static routes that can compete with BGP.
Configuring the Second UniFi Tunnel
The second tunnel is identical with four values changed:
| Field | Value |
|---|---|
| Name | AWS-Tunnel-2 |
| Pre-shared key | Tunnel 2 key from AWS |
| Remote IP | 192.0.2.233 |
| Tunnel IP | 169.254.86.178/30 |
At this point UniFi should show both IPsec tunnels as established. AWS may still show their status as DOWN with the detail IPSEC IS UP. That is expected for a dynamic VPN. AWS does not consider the tunnel fully up until both IPsec and BGP are established.
Configuring BGP
UniFi configures BGP by uploading a configuration file in FRR format under Settings, Routing, BGP. Here is the complete configuration I used with the example addresses from this post:
|
|
There are a few details worth explaining.
redistribute connected advertises networks configured directly on the UCG. The LAN_ONLY route map limits that redistribution to subnets inside 192.168.0.0/16, so the tunnel networks and WAN network are not advertised to AWS. Adding another home VLAN within that range does not require editing the BGP configuration.
The inbound filter accepts AWS routes within 172.16.0.0/12. It will not accept a default route, which prevents an AWS routing mistake from sending all of my home Internet traffic into the tunnel. If you create a VPC outside that range, add its address range to AWS_PREFIXES.
The le 32 is important. Without it, the prefix list would match only the exact 172.16.0.0/12 route. AWS advertises the actual VPC prefixes, such as 172.31.0.0/16, so an exact match would establish BGP but install no routes.
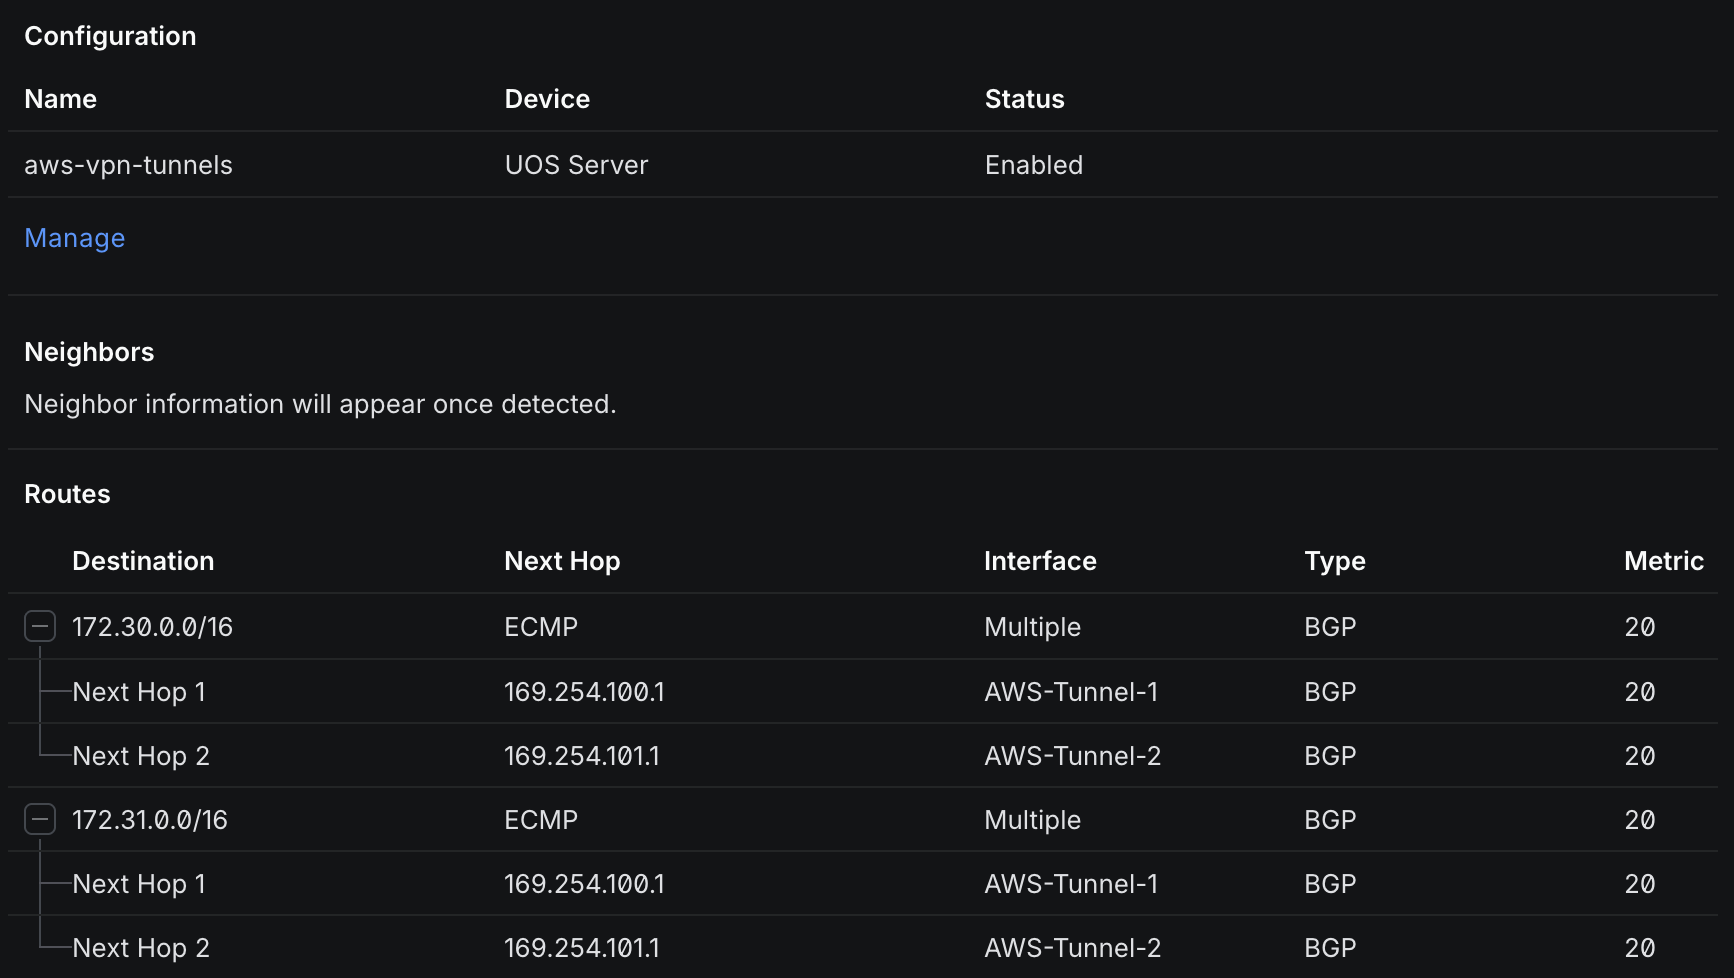
Finally, maximum-paths 2 tells FRR to install both equal BGP paths. This is the part that fixes the asymmetric routing problem I described in the 2020 post. AWS can send return traffic through either tunnel. With both next hops installed, the UCG has a valid route through either interface.
This works as written with a Transit Gateway because AWS presents equal route attributes across both tunnels. A Virtual Private Gateway uses different MED values to indicate its preferred tunnel, so the two routes may not qualify as equal paths.
The route maps and prefix lists must come after the router bgp block. Also, replace 64513 with your Transit Gateway ASN. Assuming it is 64512 because that is what most examples use produces a BGP session that never establishes.
Verifying the Connection
I check the connection from the bottom up so that each test proves one layer before I move to the next.
First, confirm that both tunnels are established in UniFi. In AWS, both tunnel rows should eventually show UP, BGP should be established, and each tunnel should have a nonzero accepted route count.
Next, look at the UCG routing table. Each AWS VPC prefix should have two next hops, one through each tunnel. If only one is present, check maximum-paths 2, confirm that ECMP is enabled on the Transit Gateway, and verify that AWS is advertising the same route attributes over both tunnels.
Then open the Transit Gateway route table. The home networks advertised by the UCG should appear as propagated routes through the VPN attachment. Also confirm that the VPC route table contains the static 192.168.0.0/16 route to the Transit Gateway.
Finally, test between hosts. I launched an EC2 instance and connected to it from a machine on my home network. I did not test from the UCG itself because gateway-generated traffic may select a source address that I am not advertising through BGP.
The last test is failover. Temporarily disable the first tunnel on the UCG, or change its pre-shared key if your UniFi release does not have an enable switch. New connections to AWS should continue through the second tunnel, and the routing table should drop from two next hops to one. Restore the first tunnel and repeat the test with the second one disabled.
Use a new TCP connection as part of the test. An existing SSH connection may survive or reset depending on which tunnel carried the flow and when the route changed. The important result is that new connections still work with either tunnel unavailable.
MTU
I left the tunnel MTU on Auto. If ping and small connections work but large HTTPS transfers or scp hang, the problem is probably packet size. AWS Site-to-Site VPN does not support Path MTU Discovery, so it will not necessarily correct itself.
For AES-256-CBC with SHA2-256, AWS lists these values:
| Encapsulation | MTU | IPv4 MSS |
|---|---|---|
| ESP without NAT-T | 1438 | 1398 |
| NAT-T | 1422 | 1382 |
Use the NAT-T values if the UCG is behind address translation and IPsec is encapsulated in UDP 4500. Otherwise use the first row. I would only set these manually after reproducing the large-transfer problem, since UniFi may already choose an appropriate value on Auto.
Closing Thoughts
The 2020 configuration required me to describe every VTI, IKE group, ESP group, peer, and BGP neighbor in JSON. On the UCG-Max, UniFi now handles almost all of the IPsec configuration in the UI. The only hand-written part left is a short FRR file for BGP.
The important pieces are still the same. Build both route-based tunnels, let BGP exchange routes, and make sure both paths are installed. The addition of maximum-paths 2, combined with Transit Gateway ECMP, means both tunnels can be active without weakening source validation or accepting intermittent asymmetric-routing failures.
It took a few more screens than a single-tunnel VPN, but it is now a configuration I can understand and maintain without relying on the old config.gateway.json escape hatch.
References
- My original 2020 USG and AWS VPN post
- UniFi Border Gateway Protocol documentation
- UniFi Site-to-Site IPsec VPN with third-party gateways
- AWS Site-to-Site VPN tunnel initiation options
- AWS customer gateway device best practices
- AWS Transit Gateway ECMP guidance