Below you will find pages that utilize the taxonomy term “Billing”
Posts
Notice that the report we are downloading is a .zip file. The detailed report can get very large. I am simply shelling out to 7Zip from the SSIS package to decompress the report. Finally, note that the report contains a few summary lines you will likely want to exclude from the report when you load. I use the following filter.
Decoding Your AWS Bill (Part 3) Loading a Data Warehouse
In the last two posts (part 1, part 2) in this series we used PowerShell to gleam information from our monthly AWS billing report. While you can use those scripts to learn a great amount of information from about your AWS usage, you will eventually outgrow PowerShell. In this post I will show you how to load the bill into SQL Server for more detailed analysis.
In the prior posts we used the monthly reports. These reports contain a single line item for each resource for the entire month. In this post we are going to use the hourly report. This report shows the detailed expenses incurred each hour. If you shut a machine down at night you will see that reflected in the report.
Creating a Staging Schema
The first step is to create a table in SQL Server to hold the data. I am calling this a staging table because this post will present a star schema for a data warehouse. But, you could simply use this one table and run reports directly against it.
AWS does not have a lot of detail on the schema for the billing reports. I have been using the following table schema for about a year now and have worked out most of the kinks. Some of my fields are likely larger than needed, but since my data eventually I end up in a star schema, I prefer to have a little buffer. Also note that I am using consolidated billing, but I am ignoring the blended rates. If you wanted to add blended rates, a real should suffice.
|
|
Loading the Data
Once you have the table created you will need to load the report. I use an SSIS job for this. I am loading the "Detailed Line Items with Resources and Tags" report. This is the most detailed report available. I created a custom script task in SSIS to download the report from S3. This package runs every six hours to refresh the data in the warehouse.
My script expects the account id, bucket name, access key, and secret key. In addition, you can optional specify the month, year and file name. If you don't specify the optional params, the script will calculate the current month and return it do you can use it later in the package. See below.
The code for my script task is below. It calculates the dates and then uses the AWS .Net API to download the file. Note that you must GAC AWSSDK.dll before SSIS will load it.
|
|
Notice that the report we are downloading is a .zip file. The detailed report can get very large. I am simply shelling out to 7Zip from the SSIS package to decompress the report. Finally, note that the report contains a few summary lines you will likely want to exclude from the report when you load. I use the following filter.
|
|
Star Schema
The final piece of the puzzle is loading the data into a warehouse for reporting. I'm not going to take you through the details of designing a data warehouse, but I can share the schema I am using. I analyzed the data a few times using a Data Profiling Task, and ultimately settled on the following dimension tables
I hope this series has been helpful.
Posts
Decoding Your AWS Bill (Part 2) Chargeback with Tags
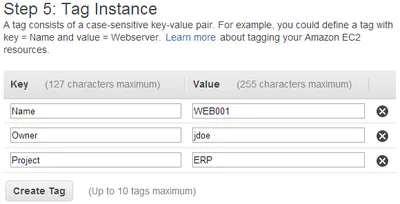
It took 6 months but I finally got time to continue the series on Decoding Your AWS bill. In the last post, we used PowerShell to download and query the monthly bill. In this post we use tags to create a cost allocation report. In the next, and final post in this series, I will show you how to load the hourly detail report into SQL Server.
Let's assume that we have multiple project teams at our company and they all have servers running in the same AWS account. We want to "charge back" each team for their usage. We begin by tagging each instance with a project name (see figure below). Notice that I also include a name and owner.
This is good start, but we learned in part one that charges are allocated to the instances as well as the volumes and network interfaces that are attached to them. Therefore, we have to tag the resources as well as the instance itself. It is probably unrealistic to ask our users to tag all the resources so let's create a script that copies tags from the instance any resources attached to it. This way our users only have to remember to tag their instances.
The script below will read all of the tags from the instance and copy them to each resource. I have something very similar scheduled to run once a day on each of my accounts.
This is a good start, but it will not really scale well. It makes an API call for ever resource every time we run it. It will work well for a handful of instances, but as we add more instances the script will take longer and longer to run. It would be better to cache the tags collection and only change update those resources that need to be changed. Here is a much better version.
Now we have to add the tags we created to our reports. I assume at this point that you have billing reports enabled. If not, see my prior blog post. Log into the web console using your account credentials (not IAM credentials) and click on your name in the top right corner. From the dropdown, click "Billing and Cost Management." Choose "Preferences" from the menu down the left side of the screen. Finally, click the "Manage Report Tags" link toward the end of the screen.
Now, find the tags you want to include in the report (see the figure below). Make sure you include the project tag.
Now we can download and query the report just like we did in the last post. The only change is that we are going to use the "$AccountId-aws-cost-allocation-$Year-$Month.csv" report rather than the "$AccountId-aws-billing-csv-$Year-$Month.csv" report we used before.
In addition, note that the custom tags we added will appear in the report as user:tag. So our Project tag will appear as user:Project. Therefore, if we wanted to return all the costs associated with the ERP project we would use a PowerShell query like this:
Now, we have a little problem. You may notice that if you add up all costs associated to all projects, it does not sum to the invoice total. This is expected. There are a few costs we did not capture. First, we only tagged EC2. If you want to allocate other services, you will need to develop a similar strategy to the one we used above for EC2. Second, you may have a support contract that adds 10% to the bill. Third, there are some EC2 costs, like snapshots that do not include tags in the report. There is nothing we do we these last two, but allocate them to the projects as overhead. The script below will do just that. I'm not going to go into detail, but you can look though my script to understand it.
When you run this script it should output the statement total and a table showing the costs allocated to each project. Similar to the the following.
That's it for this post. In the next post we use the hourly report to populate a warehouse in SQL Server.
Let's assume that we have multiple project teams at our company and they all have servers running in the same AWS account. We want to "charge back" each team for their usage. We begin by tagging each instance with a project name (see figure below). Notice that I also include a name and owner.
This is good start, but we learned in part one that charges are allocated to the instances as well as the volumes and network interfaces that are attached to them. Therefore, we have to tag the resources as well as the instance itself. It is probably unrealistic to ask our users to tag all the resources so let's create a script that copies tags from the instance any resources attached to it. This way our users only have to remember to tag their instances.
The script below will read all of the tags from the instance and copy them to each resource. I have something very similar scheduled to run once a day on each of my accounts.
|
|
This is a good start, but it will not really scale well. It makes an API call for ever resource every time we run it. It will work well for a handful of instances, but as we add more instances the script will take longer and longer to run. It would be better to cache the tags collection and only change update those resources that need to be changed. Here is a much better version.
|
|
Now we have to add the tags we created to our reports. I assume at this point that you have billing reports enabled. If not, see my prior blog post. Log into the web console using your account credentials (not IAM credentials) and click on your name in the top right corner. From the dropdown, click "Billing and Cost Management." Choose "Preferences" from the menu down the left side of the screen. Finally, click the "Manage Report Tags" link toward the end of the screen.
Now, find the tags you want to include in the report (see the figure below). Make sure you include the project tag.
Now we can download and query the report just like we did in the last post. The only change is that we are going to use the "$AccountId-aws-cost-allocation-$Year-$Month.csv" report rather than the "$AccountId-aws-billing-csv-$Year-$Month.csv" report we used before.
In addition, note that the custom tags we added will appear in the report as user:tag. So our Project tag will appear as user:Project. Therefore, if we wanted to return all the costs associated with the ERP project we would use a PowerShell query like this:
|
|
Now, we have a little problem. You may notice that if you add up all costs associated to all projects, it does not sum to the invoice total. This is expected. There are a few costs we did not capture. First, we only tagged EC2. If you want to allocate other services, you will need to develop a similar strategy to the one we used above for EC2. Second, you may have a support contract that adds 10% to the bill. Third, there are some EC2 costs, like snapshots that do not include tags in the report. There is nothing we do we these last two, but allocate them to the projects as overhead. The script below will do just that. I'm not going to go into detail, but you can look though my script to understand it.
|
|
When you run this script it should output the statement total and a table showing the costs allocated to each project. Similar to the the following.
|
|
That's it for this post. In the next post we use the hourly report to populate a warehouse in SQL Server.
Posts
Decoding Your AWS Bill (Part 1)
As you begin to adopt AWS you will likely be asked to report on both usage and cost. One way to do this is using the Monthly Billing report. In this post I will show you how to download your bill and analyze it using PowerShell.
AWS offers a feature called Programmatic Billing Access. When programmatic billing access is enabled, AWS periodically saves a copy of your bill to an S3 bucket. To enable programmatic billing access click here. Be sure to enable the Monthly Report.
Once programmatic billing access is enabled you can download your bill using PowerShell. The function below will download the monthly report and load it in to memory.
The monthly report is a CSV file with all of the line items in the bill you receive each month. In addition to the line items, the bill includes a few total lines. If you have consolidated billing enabled, there is an invoice total for each account and a statement total that includes the overall total.
To get the total of your bill, you simply find the StatementTotal line. For example:
Alternatively you could sum up the PayerLineItems using Measure-Object.
You can also find specific line items. For example, the following script will find the total number of on-demand instance hours.
And this line will find the total cost of the on-demand instances.
These will find the usage and cost of EBS storage.
These will find the usage and cost of S3.
And this one will show you snapshots.
As you can see there is a lot of interesting information in your bill that you can use to report on both usage and costs. In the next post I will use cost allocation report to calculate chargebacks.
AWS offers a feature called Programmatic Billing Access. When programmatic billing access is enabled, AWS periodically saves a copy of your bill to an S3 bucket. To enable programmatic billing access click here. Be sure to enable the Monthly Report.
Once programmatic billing access is enabled you can download your bill using PowerShell. The function below will download the monthly report and load it in to memory.
|
|
|
|
|
|
|
|
|
|
|
|
|
|
|
|