Running Hugo Server in AWS Cloud9 Preview
I have been moving my blog to Hugo over the holiday weekend. I am working in a Cloud9 instance. Cloud9 allows you to preview an application running in the Cloud9 instance by proxying the connection through the Cloud9 service. The URL for the proxy uses the following format.
|
|
The problem is that Hugo renders fully qualified URLs that include the baseURL found in the config file. I could update the config file, but I know I am going to accidentally check it in that way.
DNS Resolution for Private EKS Cluster
I have been working on a project to deploy Elastic Kubernetes Service (EKS) at an Academic Medical Center. They want to deploy a private cluster that does not have internet acess. EKS supports this, but DNS resolution can be tricky. There is an AWS blog post that explains how do it.
Ultimately, we need an inbound R53 resolver ENI in the EKS VPC. When you configure EKS with a private endpoint it configures DNS to only respond to requests from within the VPC. The blog post describes this in detail, but I found it a little hard to follow. I needed to draw a diagram to make sense of it. So here are my notes.
Writing unit tests for Chalice
Chalice is a Python serverless microframework for AWS that enables you to quickly create and deploy applications that use Amazon API Gateway and AWS Lambda. In this blog post, I discuss how to create unit tests for Chalice. I’ll use Chalice local mode to execute these tests without provisioning API Gateway and Lambda resources.
Creating a new project
Let’s begin by creating a new Chalice project using the chalice command line.
Note: You might want to create a virtual environment to complete the tasks in this post.
Elastic Beanstalk Worker Environment Timeouts
The instances in your Worker Environment have a demon that reads messages from an SQS Queue. That queue has a Default Visibility Timeout and Message Retention Period. In addition, the Elastic Beanstalk Worker Configuration has its own Visibility Timeout and Retention Period in addition to a Connection Timeout, Error Visibility Timeout and Inactivity Timeout.
The process works like this (see diagram below). The SQS demon polls the queue. When it reads a message, it sets the Visibility Timeout overriding the queue's Default Visibility Timeout. The demon then checks if the message is older than the Retention Period. If it is, it explicitly deletes the message, effectively overriding the queue's Message Retention Period. In other words, the Worker Environment's Visibility Timeout and Retention Period replace the queue's Default Visibility Timeout and Message Retention Period respectively.
Assuming the demon finds a message that has not exceeded the Retention Period, it does an HTTP POST with the message in the body to your application which should be listening on 127.0.0.1:80. If the demon cannot create a connection to your application within the Connection Timeout it sets the message's visibility to the Error Visibility Timeout. The message will be retied after the Error Visibility Timeout.
If the demon can create a connection, it waits for a response. If the Inactivity Timeout is exceeded before the demon receives a response, it aborts the request and sets the message's Visibility to the Error Visibility Timeout. The message will be retied after the Error Visibility Timeout.
Note that your entire run does need to complete within the Inactivity Timeout (max 30 mins). Each time your application sends data the counter is reset. In other words you can hold the HTTP connection open for longer than 30 minutes by streaming data back in small increments. You could extend this up to the Visibility Timeout (max 12 hours). While SQS allows you to reset the visibility timeout, Elastic Beanstalk does provide the receipt handle to your code.
At this point we have addressed all seven of the timeouts you can configure (2 on the queue and 5 in worker configuration), but we came this far so let's see this through to completion. If the demon receives a response from your application, it checks the return code. If the response indicates success (i.e. 200) it explicitly deletes the message from SQS and the process completes. If the response indicates failure, the demon sets the message's Visibility to the Error Visibility Timeout. The message will be retied after the Error Visibility Timeout.
EBS Snapshots with Microsoft VSS and EC2 Systems Manager.
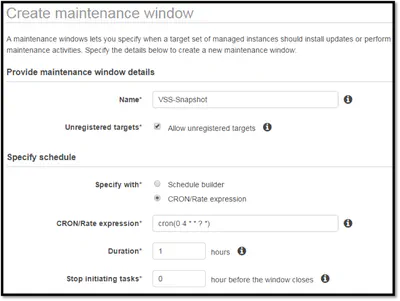
Early in my career, I learned an important lesson: backup is easy, but restore is hard. Too often we take our backup and recovery for granted. We assume that if the backup completed successful, the restore will work when we need it. Anyone who has been through a disaster recovery exercise, whether simulated or real, knows this is seldom the case.
In this post I discuss creating consistent backups of Windows Servers using the Volume Shadow Copy Service (VSS) and Elastic Block Store (EBS) snapshots. I will also use AWS Systems Manager to schedule daily backups of EBS volumes during a defined maintenance window. Feel free to follow along, but be aware that there is a CloudFormation template toward the end that will help you configure the final solution.
Simple Email Service (SES) Sample Application
|
|
Of course the tricky part is the MIME formatting. Turns out that is really easy in Python. Here is a simple example.
|
|
Then you can simply call as_string() and pass it to SES.
|
|
I messed around for a little while and created a few helper functions to handle HTML formatting and attachments. You can find the complete code in GitHub. I hope that helps someone.
Linked Account Template
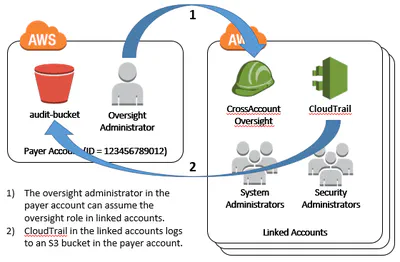
This template takes the account number of the payer account and a bucket to write CloudTrail logs to (Note: best practice is to write logs to the payer account to ensure separation of duties.) It will create:
- CloudTrail - Configures a trail that writes to the bucket specified. This bucket should be in the payer account to assure that users in the linked accounts cannot alter the log.
- CrossAccountOversight - A cross account role that users in the parent account can assume when they need access to the linked account.
- SystemAdministrators - Add users to this group if they need to manage resources in the linked account. This is just a template and you can alter it to include the subset of services you allow the account owners to use. Note that this group gives users read only access to everything so they do not get errors navigating around the console.
- SecurityAdministrators - Add users to this group if you want them to manage their own permissions. Note that if you do, they can delete your oversight role so only add users you trust.
- ChangeYourPassword - A managed policy that allows users to change their own password. Note that this policy is already associated with the SystemAdministrators group.
- DefaultInstanceRole - An instance role users can assign to an EC2 instance. I allows read only access to EC2 so instances can discover information about the environment they are running in for auto configuration at runtime.
CloudWatch Logs Trace Listener
I added a new Cloud Watch Logs Trace Listener to the .Net API for AWS. The API team plans to add support for Log4Net, but in the meantime I have been using this. https://github.com/brianjbeach/aws-dotnet-trace-listener
My Cloud EX2 Backup to Amazon S3
Overall I really like the EX2. It has great features for the price. My version came with two 4TB drives which I configured to mirror for redundancy (you can forgo redundancy and get 8TB of storage). The EX2 supports SMB and NFS. It can act a DLNA (I use an app called Vimu Player on my Fire TV) or iTunes server (unprotected audio only). For the more advanced user, you can also join Active Directory, act as an iSCSI target, and mount ISO images. The EX2 can backup to another EX2, Elephant Drive or Amazon S3. The rest of this post focuses on backup to S3 which is less than perfect, but with a little effort I have it running reliably.
Backup
At a high level, I want the back to protect me from three things: 1) Hardware failure. The EX2 has two disks, but I still want a more protection. 2) My own stupidity. I might accidentally delete or overwrite something. 3) Malware. Most notably CryptoLocker or similar ransom ware. The backup agent built into the EX2 offers three backup types (taken from here):- Overwriting existing file(s): Overwrites files in the target folder that have the identical name as your source file.
- Full Backup: Creates a separate folder containing all of the backup data each time the backup is performed.
- Incremental Backup: Overwrites files with source files that are newer then the target files.
I wanted the third option, and this is what I am running. Unfortunately, it does not work as advertised. Every once in a while it overwrites files that have not changed. This would be not a big deal, but I want to run versioning to protect against malicious malware overwriting my files. With versioning enabled, S3 stores every version of your files so you can always roll back to an old copy.
The problem is that the EX2 keeps adding versions. Over the past six months it has created as many as 10 copies of a file that has never changed. This has driven my bill up dramatically. To keep my bill in check I resorted to a lifecycle policy that moves my files to glacier and removes old versions after 30 days. Glacier is much cheaper and and 30 days gives me enough time to fix a mistake.
Configuration
The first thing I created was an S3 bucket. There is noting special here, just accept the defaults. Then, I created the lifecycle policy described above. The configuration looks like this:Next, I needed an IAM user for the backup job on the EX2. I created a user policy that had only those rights needed by the backup job. This way, even if my EX2 were compromised, the attacker could never delete from my bucket or access other resources in my account. My policy looks like this.
|
|
Finally, I could configure the backup job on the EX2. The configuration above has been running for a while now. It still overwrites files that have not changed, but the lifecycle policy keeps them under control.
Configuring an AWS Customer Gateway Behind a NAT
The 871 (or a similar device) is a great way to get some hands on experience configuring a Virtual Private Gateway. Despite its age, the 871 is actually a capable device and it’s available on eBay for less than $100. While most production implementations will not require NAT traversal, this is also good experience. You may want to peer two VPCs (in the same or different regions) and one common solution is to use two Cisco CSR1000V (available in the AWS Marketplace). In this configuration both CSR100V devices will require an Elastic IP, which uses NAT.
In the AWS VPC console, I created a VPN Connection as shown below. Note that I have entered the public IP address of the Netgear router (203.0.113.123) as the IP address of a new Customer Gateway. I also configured static routing and entered the CIDR block of my home network (192.168.0.0/16).
Once the VPN connection is created you can download the router configuration. I choose a Cisco Systems ISR Series Router. In order to support NAT traversal you will need to modify the configuration slightly. You need to find the six places where the public IP address appears and replace it with the private IP address of the IPSec router. Not that there will two of each of the highlighted sections below, one for Tunnel1 and one for Tunnel2.
|
|
|
|
|
|
|
|
Extra Credit: Securing the Home Network
In order to protect my home network from nefarious traffic from AWS, I added a “firewall” policy using inspect statements on the 871. The ACL defines what is allowed from AWS. In this case, just ping for testing. All traffic to AWS is allowed and the inspect rules open the return path for any traffic initiated from my house. SSH and FTP defines high level inspect rules specific to these protocols.
|
|
Discovering Windows Version on EC2 Instances
One solution is to use the System log. If the instance has the EC2 Config service running on it it will report the OS version (along with a few key driver versions to the console). You can access the System Log from the console by right clicking on an instance and choosing "View System Log". For example, the output below is from a Windows 2003 R2 instance I just launched. Notice the OSVersion on line three.
|
|
I created a script that will query the system log (also called the console) from every Windows instance in every region using PowerShell. It then applies a regular expression to parse the OS version number.
|
|
You can see the sample output below. The last instance is Windows 2003 indicated by the version number 5.2. You can find a list of version numbers on Microsoft's Web Site.
|
|
Blogger is messing with the script a bit. You can download a copy here. Just rename it from .txt to .ps1.
Configuring a Linux Swap Device with Cloud-Init
Cloud-Init is a set of Python scripts used to configure Linux instances when they boot in AWS. Cloud-Init is included on Ubuntu and Amazon Linux AMIs.
You can think of a Cloud Init script as a bare-bones Configuration Management solution like Chef or Puppet. A Cloud-Init script is passed as user data. If you have ever passed a shell script as user data, it was Cloud-Init that queried the meta-data service and executed the script. But, Cloud-Init offers a higher level syntax known as cloud-config.
CloudWatch Logs Push
It turns out that CloudWatch logs is implemented as a plugin to the AWS CLI. The plugin can be configured to read from a file or you can simply pipe events directly yo it on the command line.
You need to register the plugin in your config file (~/.aws/config). Mine looks like this.
|
|
Now you can simply pipe data to "aws logs push." You need to specify the group stream and date format as parameters. And, of course, the group and stream must already exist in AWS. For example:
|
|
CloudWatch Logs and TCPDump
NOTE: I found a much cleaner way to do this presented here.
The awslogs package/daemon can be configured to upload any log file. Just add a new configuration block to /etc/awslogs/awslogs.conf. For example, the configuration below says to upload the contents of /var/log/tcpdump to a stream identified with the servers instance id in a log group called NetworkTrace. Note that the group and stream must be created on the AWS console first.
|
|
With that done, you can start tcptrace and have it dump to a file. But, by default, tcp trace does not include the full date and time in each record. You need to include the -tttt option to so that awslogs can parse the date and time correctly. The -tttt option will use the format 2014-09-24 15:20:29.522949.
Now simply start a background process to dump the trace to a file and you should start to see events in CloudWatch. For example, this will capture everything with minimal detail.
|
|
|
|
Decoding Your AWS Bill (Part 3) Loading a Data Warehouse
Creating a Staging Schema
|
|
Loading the Data
|
|
Notice that the report we are downloading is a .zip file. The detailed report can get very large. I am simply shelling out to 7Zip from the SSIS package to decompress the report. Finally, note that the report contains a few summary lines you will likely want to exclude from the report when you load. I use the following filter.
|
|
Star Schema
The final piece of the puzzle is loading the data into a warehouse for reporting. I'm not going to take you through the details of designing a data warehouse, but I can share the schema I am using. I analyzed the data a few times using a Data Profiling Task, and ultimately settled on the following dimension tablesDecoding Your AWS Bill (Part 2) Chargeback with Tags
Let's assume that we have multiple project teams at our company and they all have servers running in the same AWS account. We want to "charge back" each team for their usage. We begin by tagging each instance with a project name (see figure below). Notice that I also include a name and owner.
This is good start, but we learned in part one that charges are allocated to the instances as well as the volumes and network interfaces that are attached to them. Therefore, we have to tag the resources as well as the instance itself. It is probably unrealistic to ask our users to tag all the resources so let's create a script that copies tags from the instance any resources attached to it. This way our users only have to remember to tag their instances.
The script below will read all of the tags from the instance and copy them to each resource. I have something very similar scheduled to run once a day on each of my accounts.
|
|
This is a good start, but it will not really scale well. It makes an API call for ever resource every time we run it. It will work well for a handful of instances, but as we add more instances the script will take longer and longer to run. It would be better to cache the tags collection and only change update those resources that need to be changed. Here is a much better version.
|
|
Now we have to add the tags we created to our reports. I assume at this point that you have billing reports enabled. If not, see my prior blog post. Log into the web console using your account credentials (not IAM credentials) and click on your name in the top right corner. From the dropdown, click "Billing and Cost Management." Choose "Preferences" from the menu down the left side of the screen. Finally, click the "Manage Report Tags" link toward the end of the screen.
Now, find the tags you want to include in the report (see the figure below). Make sure you include the project tag.
Now we can download and query the report just like we did in the last post. The only change is that we are going to use the "$AccountId-aws-cost-allocation-$Year-$Month.csv" report rather than the "$AccountId-aws-billing-csv-$Year-$Month.csv" report we used before.
In addition, note that the custom tags we added will appear in the report as user:tag. So our Project tag will appear as user:Project. Therefore, if we wanted to return all the costs associated with the ERP project we would use a PowerShell query like this:
|
|
Now, we have a little problem. You may notice that if you add up all costs associated to all projects, it does not sum to the invoice total. This is expected. There are a few costs we did not capture. First, we only tagged EC2. If you want to allocate other services, you will need to develop a similar strategy to the one we used above for EC2. Second, you may have a support contract that adds 10% to the bill. Third, there are some EC2 costs, like snapshots that do not include tags in the report. There is nothing we do we these last two, but allocate them to the projects as overhead. The script below will do just that. I'm not going to go into detail, but you can look though my script to understand it.
|
|
When you run this script it should output the statement total and a table showing the costs allocated to each project. Similar to the the following.
|
|
That's it for this post. In the next post we use the hourly report to populate a warehouse in SQL Server.
Bulk Importing EC2 Instances
While the new command will upload and convert your VM, you can also do the upload and convert independently. This left me wondering if I could use the AWS Import/Export Service to ship a an external drive full of VMDK files and skip the upload process. After some testing, it turns out you can. Depending on the number of VMs you plan to migrate and the speed of your internet connection, this may be a great alternative.
Let me clarify that I am speaking of two similarly named services here. EC2 Import is used to convert a VMDK (or VHD) into an EC2 Instance. AWS Import allows you to ship large amounts of data using removable media.
Normally, the EC2 Import process works like this. First, the PowerShell module breaks up the VMDK into 10MB chucks and uploads it to an S3 bucket. Next, it generates a manifest file that describes how to put the pieces back together, and uploads that to S3. Then, it calls the ec2-import-instance REST API passing a reference to the manifest. Finally, the import service uses the Manifest to reassemble the VMDK file and convert it into an EC2 instance.
The large file is broken into chunks to make the upload easier and allow it recover from a connection error (retrying a part rather than the entire file.) With the AWS Import/Service there is no need to break up the file. Note that S3 supports objects up to 5TB and EC2 volumes can only be 1TB. So there is no reason not to upload the VMDK as a single file.
So, all we need to do is create the manifest file and call the E2 Import API passing a reference to the manifest file. If you have ever looked at one of these manifest files, they can look really daunting. But, with only a single part, it's actually really simple. Note that all of the URLs are pre-signed so the Import Service can access your VMDK file without granting IAM permissions to the import service.
|
|
Obviously there is room for improvement here. You could import directly to a VPC, support Linux instances, or use the Import-Ec2Volume command to import additional (non-boot) volumes. Hopefully this is good starting point.
Note that prerequisites for the EC2 Import still apply. For example, you must convert the VMDK files to an OVF before shipping.
Writing to the EC2 Console
The EC2 Console, it turns out, is listening to Serial Port COM1. So if want to write a message to the log, all you have to do is write to COM1. Of course the EC2 Config Service already has COM1 open, so we have to close it first. Here is a quick sample.
|
|
You can also use a helper class that ships with EC2 Config Service called ConsoleLibrary. This implementation is thread-safe, adds the date and time, and takes care of all the serial port configuration details. Of course you still need to close the EC2 Config Service before running this code.
|
|
As you can see below, me messages appear mixed in with the standard console messages, but note that the Console is only updated during boot. If you write to the log after boot the messages will not appear until the next reboot.
|
|
Setting the Hostname in a SysPreped AMI
In this post we will use PowerShell to read the name from a Tag on the instance. When done, you set the hostname in launch wizard by simply filling in the Name tag. See the image below. Our script will read this tag and rename the server when it boots for the first time.
It is important to automate the name change. As your cloud adoption matures, you quickly realize that you cannot have an admin log in and rename the server when it's launched. First, it takes too long. Second, you want servers to launch automatically, for example, in response to an auto-scaling event.
So how can you set the name? You will find a ComputerName element in the SysPrep2008.xml file that ships with the EC2 Config Service (or in the unattended.xml file if you're not using the EC2 Config Service.) The computer name is in the specialize section. In the snippet below, you can see the default value of "*". The star means that windows should generate a random name.
|
|
If you want to change the name you can simply hard-code whatever you want here. Of course, if you hard-code if before you run SysPrep, every machine you create from the AMI will have the same name. That's not what we want. So the trick is to set the name when the machine first boots and before specialize runs.
Let's quickly review how SysPrep works. When you run SysPrep, it wipes any identifying information form the machine (e.g. Name, SIDs, etc.) This is known as the generalize phase. After the generalize phase you shutdown the machine and take the image.
When a SysPreped image first boots, it runs windows setup (WinDeploy.exe). This is known as the specialize phase. If you have ever bought a new home computer, you have experienced the setup wizard that allows you to configure your timezone, etc. In the cloud you cannot answer questions so you have to supply an unattended.xml file with the answers to all the questions.
We need to inject our script into the specialize phase before setup runs. Our script will get the machine name from the EC2 API and modify the unattended.xml file. Here is a sample script to do just that. The script has three parts.
- The first part uses the meta-data service to discover the identity of the instance and the region the machine is running in.
- The second part of the script uses the EC2 API to get the name tag from for the instance. Note that I have not included any credentials. I assume that the instance is in a role that allows access to the Get-EC2Tag API call.
- The third part of the script modifies the unattended.xml file. This is the same file shown earlier. The script simply finds the ComputerName node and replaces the * with the correct name.
|
|
So how do we get this script to run before setup? That's the tricky part. Let's dig a bit deeper. I said earlier that when a SysPreped image first boots it will run WinDeploy.exe. To be more specific, it will run whatever it finds in the HKLM:\System\Setup registry key. SysPrep will put c:\Windows\System32\oobe\windeploy.exe in the registry key before shutdown.
So we need to change that registry key after SysPrep runs, but before the system shuts down. To do that we need to pass the /quit flag rather than /shutdown. I'm writing about AWS, so I assume you are calling SysPrep from the EC2Config service. If you are, you need to edit the switches element of the BundleConfig.xml file in the EC2Config folder. The switches element is about midway down the file. See the example below. Just remove /shutdown and replace it with /quit.
|
|
Alright, we are almost there. Now you can run SysPrep and it will give you a chance to make changes before shutting down. You want to replace the HKLM:\System\Setup registry key with the script we created above. Don't forget to add a line to call WinDeploy.exe at the end of the script.
With all that done (it's not as bad it sounds) you can shutdown and take an image. It will take a few tries to get all this working correctly. I recommend that you log the output of the script using Start-Transcript. If the server fails to boot you can attach the volume to another instance and read the log.
Decoding Your AWS Bill (Part 1)
AWS offers a feature called Programmatic Billing Access. When programmatic billing access is enabled, AWS periodically saves a copy of your bill to an S3 bucket. To enable programmatic billing access click here. Be sure to enable the Monthly Report.
Once programmatic billing access is enabled you can download your bill using PowerShell. The function below will download the monthly report and load it in to memory.
|
|
|
|
|
|
|
|
|
|
|
|
|
|
|
|
Fun with AWS CloudTrail and SQS
The picture below describes the solution. CloudTrail periodically writes log files to an S3 bucket (1). When each file is written, CloudTrail also sends out an SNS notification (2). SQS is subscribing to the notification (3) and will hold it until we get around to processing it. When the PowerShell script runs, it pools the queue (4) for new CloudTrail notifications. If there are new notifications, the script downloads the log file (5) and processes it. If the script finds interesting events in the log file, it writes them to another queue (6). Now, other applications (like our CMDB) can subscribe to just the events it needs and does not have bother processing the log files.
Let’s start by Configuring CloudTrail. I just created a new S3 bucket and enabled SNS notifications creating a new topic named “CloudTrail”.
Now let’s create a new queue called “CloudTrail”. I just left the default values. This queue will hold notifications that a new CloudTrail log file has been written. You should also create queues for each of the events you care about. I created a queue for instances (to update the CMDB) and one for users (to notify the security team of new users).
Next, we need to subscribe our “CloudTrail” SQS queue to the “CloudTrail” SNS topic. Right click on the CloudTrail queue and choose “Subscribe Queue to SNS Topic.” Then choose the “CloudTrail” topic from the dropdown and click Subscribe.
The messages in the queue will look like the example below. The CloudTrail message (yellow) is wrapped in a SNS notification (green) which in turn is wrapped in an SQS message (blue). Our script will need to unwrap this structure to get to the CloudTrail message.
Let’s begin our PowerShell script by defining the queues. First we need the URL of our CloudTrail queue.
|
|
|
|
|
|
|
|
|
|
|
|
|
|
|
|
|
|
|
|
Using Fiddler with an iPhone/iPad
HTTP Traffic
First, you need to enable connections from remote devices. Start Fiddler, and choose Fiddler Options from the Tools menu. Make note of the "Fiddler listens on port". You will need this in the next step. Now, select the "Allow remote computers to connect" option and click OK. You be asked to restart Fiddler.
Now that Fiddler is listening, you need to configure the iPhone/iPad to use the proxy server. Go into Settings and click Wi-Fi. Then click on the little circle with the arrow next to the active connection. Scroll down to the bottom and change the HTTP Proxy to manual. Now enter the IP address of your Windows box and the port that Fiddler is listening. See the image below. BTW: if you're using a VPN connection, you need to configure the proxy settings on the VPN configuration page.
HTTPS Traffic
At this point you can examine HTTP traffic, but not HTTPS. Fiddler can be configured to do this, but the default Fiddler root certificate is not compatible with iPhone/iPad. To replace the default certificate with one that the iPhone/iPad will trust, download and run the certificate maker utility from the fiddler web site: http://www.fiddler2.com/dl/FiddlerCertMaker.exe
In order to see HTTPS traffic, you need to configure Fiddler to decrypt HTTPS. You can do this by choosing Fiddler Options from the Tools menu. Choose the HTTPS tab and ensure that "Decrypt HTTPS traffic" is enabled. If it is already enabled, I suggest that you disable it, click the "Remove Interception Certificates", and then enable it again. This will clean out the existing certificates and make it easier to find the new certificate in the steps below. Before you close the options dialogue click the "Export Root Certificate to Desktop" button.
Now you should be able to examine HTTPS URLS, but you will get a warning message similar to the one below each time you access a new URL. If you're debugging a web application and don't mind clicking continue now and then, feel free to stop reading here.
Eliminating the "Cannot Verify Server" warning
If your debugging an app that makes web service calls, you may not have the option to accept the warning above. In order to eliminate the error, you are going to need to import the Fiddler root certificate. In order to do this, you are going to need the iPhone Configuration Utility. You can download it from here: http://support.apple.com/kb/DL1466
Once you download and install it, launch the iPhone Configuration Utility. Choose Configuration Profiles and Click New. Configure the general options as shown below.
Now, go to the credentials tab and click Configure. Find the certificate issued to DO_NOT_TRUST_FiddlerRoot. If you have updated fiddler a few times, there may be more than one. If so, open each certificate and compare the certificates serial number to the one you exported above.
Now connect your device and find it in the iPhone Configuration Utility under DEVICES. Chose the Configuration Profiles tab , and push the Install button next to the new profile you just created. A message will appear on the device, click install (you may need to enter your pin).
Now you should be able to debug web applications that make AJAX calls as well as native apps. Good luck and feel free to post questions below.
SSL, IIS, and Host Headers
There is a lot of confusion about how IIS handles SSL. With all the confusion out there, I thought I should put together a quick post. This post will also explain the error message: At least one other site is using the same HTTPS binding and the binding is configured with a different certificate.
My discussions this week were specific to SharePoint, but the confusion is with host headers in IIS. The crux of the issue is that when IIS receives a request, the host header is encrypted. Therefore, IIS cannot determine which web site to route the request to.
Let’s start with a simple example without SSL. Say that I have two URLs http://www.brianbeach.com and http://blog.brianbeach.com. If I want to host them both on the same server, I have to set up bindings. I can tell IIS to listen on a specific IP address and port combination, or I can use host headers. See the image below.

If we look at the individual bindings, notice that IIS is listening on all IP addresses for any request to www.brianbeach.com on port 80.

So, how does this work? When your browser requests a page from www.brianbeach.com, it first resolves the IP address from DNS. Let’s say that IP address 192.168.1.2. Then, it sends a TCP packet to 192.168.1.2 on port 80. The body of the request looks like this.
When, IIS receives this request, it reads the last line, and routes it to the www.brianbeach.com site, based on bindings we configured above.
1 2 3 4 5 6 7 8
GET http://www.brianbeach.com/ HTTP/1.1 Accept: text/html, application/xhtml+xml, */* Accept-Language: en-US User-Agent: Mozilla/5.0 Accept-Encoding: gzip, deflate Connection: Keep-Alive Host: www.brianbeach.com
Herein lies the problem. Note that the host header (Host: www.brianbeach.com) only exists inside the body of the message. If I sent this request over SSL, IIS would not be able to read the host header until it decrypted the message. And, IIS cannot decrypt the message until it knows which site’s private key to use. Alas, a catch 22.
Therefore, it would seem that I cannot use host headers with SSL. In fact, notice that when I create an http binding, the host header is disabled. So, it would seem that, if we use SSL, we can only create bindings based on the IP address and port. In general this is true, but there is an exception: wildcard certificates.

A wildcard certificate is a certificate that can be used to secure multiple sub-domains. For example, a wildcard certificate, created for *.brianbeach.com can be used for both www.brianbeach.com and blog.brianbeach.com. Notice that when I select a wildcard certificate in IIS, the host header textbox is again enabled.

If you have been paying attention, you should be asking yourself: How does IIS know which certificate to use? Now I have two sites that both use the same certificate, but IIS still needs to decrypt the message to determine if it is destined for one of the two site that use this certificate. We could be hosting other site after all.
IIS does this based on the port number. You can only configure one certificate per port. First, IIS looks up the certificate based on the port the message was received on. Next, it decrypts the message and reads the host header. Finally, it uses the host header to route your request to the correct web site.
Note: that this only works with wildcard certificates and subdomains. I cannot host www.brianbeach.com and www.someothersite.com on the same server, because they do not use the same certificate. Also, note that wildcard certificates only work for a single level. Therefore, I cannot host www.blog.brianbeach.com using *.brianbeach.com.
BTW: Have you ever received the warning message below? When you try to configure a new https binding on a port that is already in use by another site, IIS warns you that you are about to change the SSL certificate for all sites listening on that port.
SharePoint 2010: Full Trust Proxy
If you’re using the multi-tenant features of SharePoint, you will want tenants to use the sandbox. But, you will quickly find limitations. For example, developers cannot call a web service, read data from a external database, or write to the event log. One solution is for the farm administrator to deploy a full trust proxy that developers can use. Microsoft has a good description here, but there are no good examples. So I created one.
Let’s create a full trust proxy that will allow developers to write to the event log. Sandbox code is executed in SPUWorkerProcess.exe (see diagram below). The Code Access Security (CAS) policy in this process does not allow developers to access the event log. Therefore, we will write a full trust proxy that will marshal the call to SPUWorkerProcessProxy.exe which can access the event log.
Create the FullTrustProxy
Start by creating a new “Empty SharePoint Project” that is deployed as a “farm solution”. Remember this is the solution that the farm administrator deploys. The tenant developer’s code will be deployed as a sandbox solution.
Next, add a new class called EventLogProxyArgs that inherits from Microsoft.SharePoint.UserCode.SPProxyOperationArgs. This is the class that will hold the data that needs to be marshaled from SPUWorkerProcess.exe to SPUWorkerProcessProxy.exe. Therefore it needs to be marked with a Serializable attribute. The code is below:
|
|
Now, add a another class called EventLogProxy that inherits from Microsoft.SharePoint.UserCode.SPProxyOperation. You will need to implement the Execute method. The execute method is passed a copy of the EventLogsProxyArgs we created above. The code is below:
|
|
Create the Feature
Start by adding a new farm feature and fill out the title and description.
Now add an event receiver. The event receiver will register the proxy with SharePoint. The code is below:
|
|
Deploy and Test
You’re ready to deploy your package. Tenant developers can call the proxy from the sandbox. Here is an example:
|
|
Now, if you’re like me, the thought of writing seven lines of code to write one line to the log is crazy. Therefore, I added one more class to my solution with a helper method tenant developers can call.
Add a class called EventLog. You will need to mark this class with the AllowPartiallyTrustedCallersAttribute attribute so that users can call it from the sandbox. NOTE: I also marked the EventLogProxy and EventLogProxyArgs classes as internal so that developers would not be confused by them. The code is below:
|
|
At this point a developer can write to the event log with a single line of code as follows:
|
|
Finally, you can download the solution here.
you will likely run into issues. If you need to check which proxies are registered, you can use the following PowerShell script.
|
|